Outside of learning a programming language, source control is one of the most important skills for developers. Controlling how your code changes over time, and how those changes are shared and integrated into applications over time really all starts with source control. In this post, I’ll try to give you a basic understanding of the popular source control tool in the world - Git.
Before we get started, just know that I’ll be assuming you know at least a little bit about the command line on your operating system, how to open it and how to use some basic commands to change directories or create files. Also, if you’re interested in a video course version of this material, you can always sign up for a free trial of Pluralsight to take my AWS DevOps course that this materials is from.
What Is Version Control?
So let’s start by clarifying what version control is! Here’s my working definition:
Version control systems allow you to track and manage code changes over time
But this only skims the surface! As a developer, you’ll use version control:
- To record the history of your changes to code
- To help resolve conflicts between different versions of code
- As a critical part of systems that will update your applications automatically
And potentially a lot more!
Types of Version Control
Technically, there are lots of different tools that fall under the larger umbrella of version control (also known as “source control”). Here are just a few of them:
- Subversion (SVN)
- CVS
- Perforce
- Mercurial
- Git
While there are lots of different ways to control versions of your code, Git is by far the most popular today for the majority of development. However, if you end up coding at organizations with much older code bases you could very well see something else.
Installing Git
In order to start using Git, you’ll need to get it set up on your machine. You can download Git from the Git-SCM website.
However, depending on your operating system you might already have it on your machine. To check, you can open up your command line and run git --version.
Git Essentials
Good news bad news.
Bad news - This isn’t going to be a comprehensive introduction to Git. There’s a lot to learn about Git and I could safely bet that most developers don’t have half the possible Git commands memorized.
Good news - There are half a dozen Git commands developers use all the time and the rest we can look up if we ever need them. We’ll focus on the essential concepts and commands you need to understand to work with Git!
Git Concepts
First, let’s define a few concepts:
- Repositories are where your code is stored, either on your computer or somewhere else where your team can collaborate on it with you.
- Remotes are a type of repository that isn’t on your local machine, but are somewhere else like GitHub, BitBucket or a private server somewhere.
- Your Working Directory is the folder you put all your code in on your machine.
Let’s start with these concepts, and add a few more as we go!
Using Git
When we start using Git, we’re either going to want to:
- Copy a remote repository to our local machine
- Create a new local repository
For this, we’ll imagine we have a remote repository already and we want to copy it to our local environment:
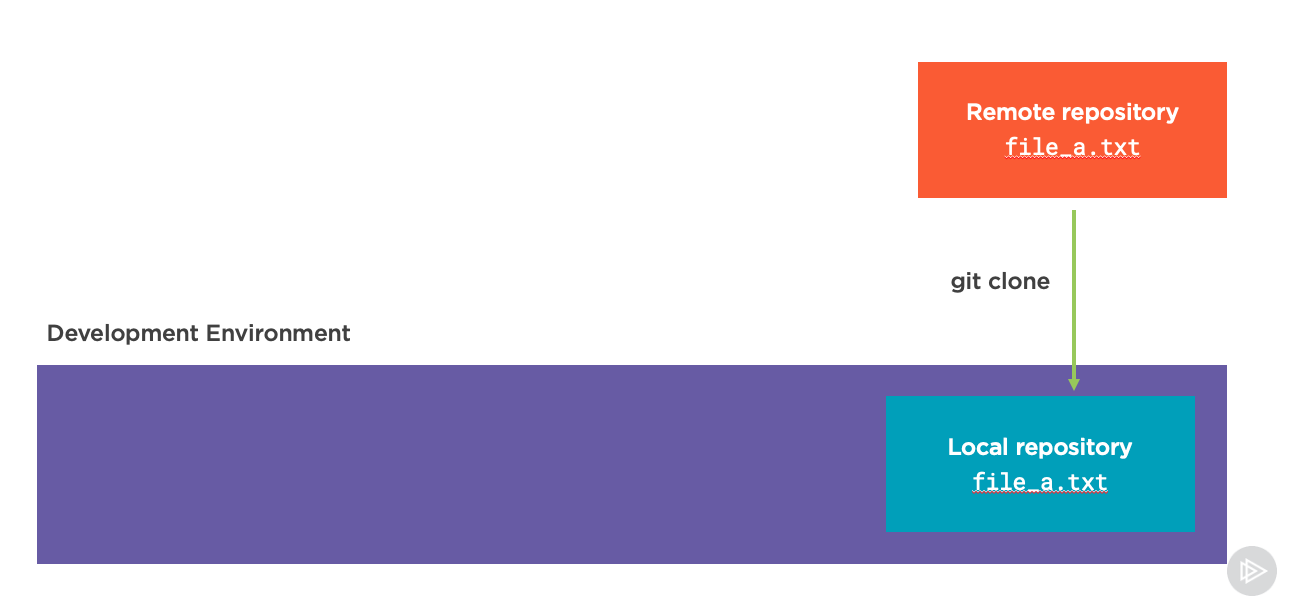
To do this, we’d use the git clone command with whatever the repository URL was for our remote repository. For example, to clone a project of mine called Serverless Jams that is hosted on my account in GitHub we might run a command like this:
git clone https://github.com/fernando-mc/serverlessjams
Assuming this repository was public, or we had access to it, Git would then go grab the code for it and bring a copy of the repository locally. Now importantly, if we want to make changes to the remote version of repository, we need to have permissions to do so.
If we did, the next step might be to change directories into this cloned repository and start making changes. Let’s say we create a new file called file_b.txt in the working directory of this Git repository:
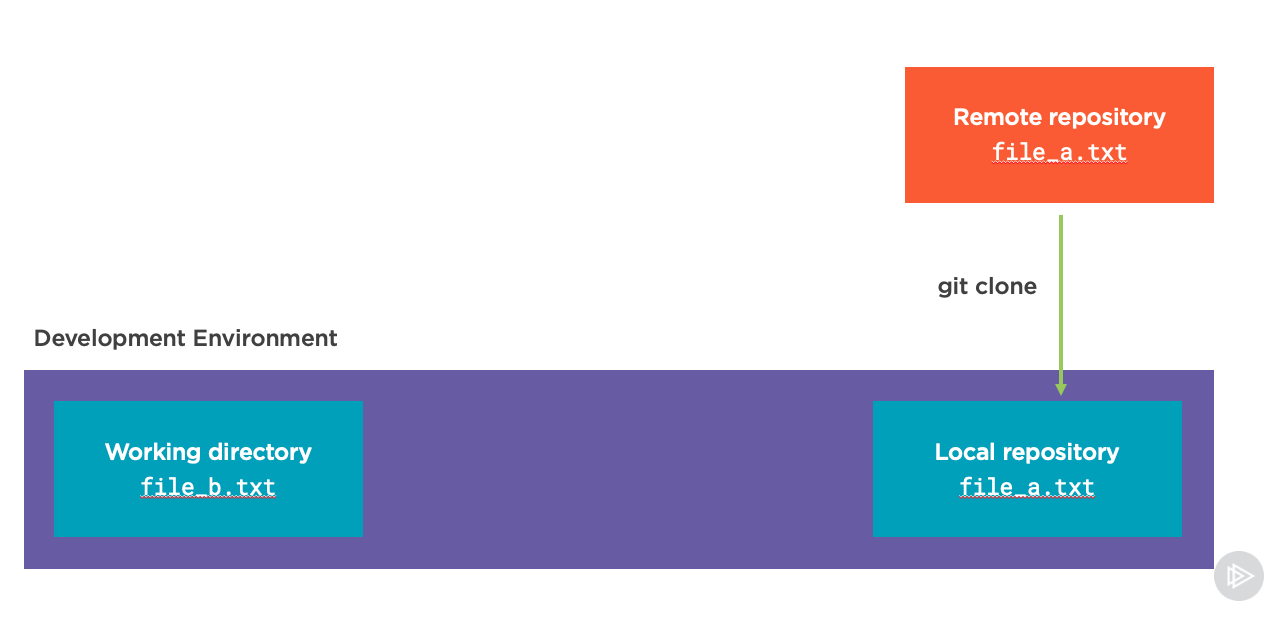
When we do this, the file doesn’t immediately get saved in the repository or sent up to GitHub. First, we need to make the conscious decision that the file we added is something we want to prepare to be added to our repository. This process is called adding the file to our staging area. We do this with the git add command:
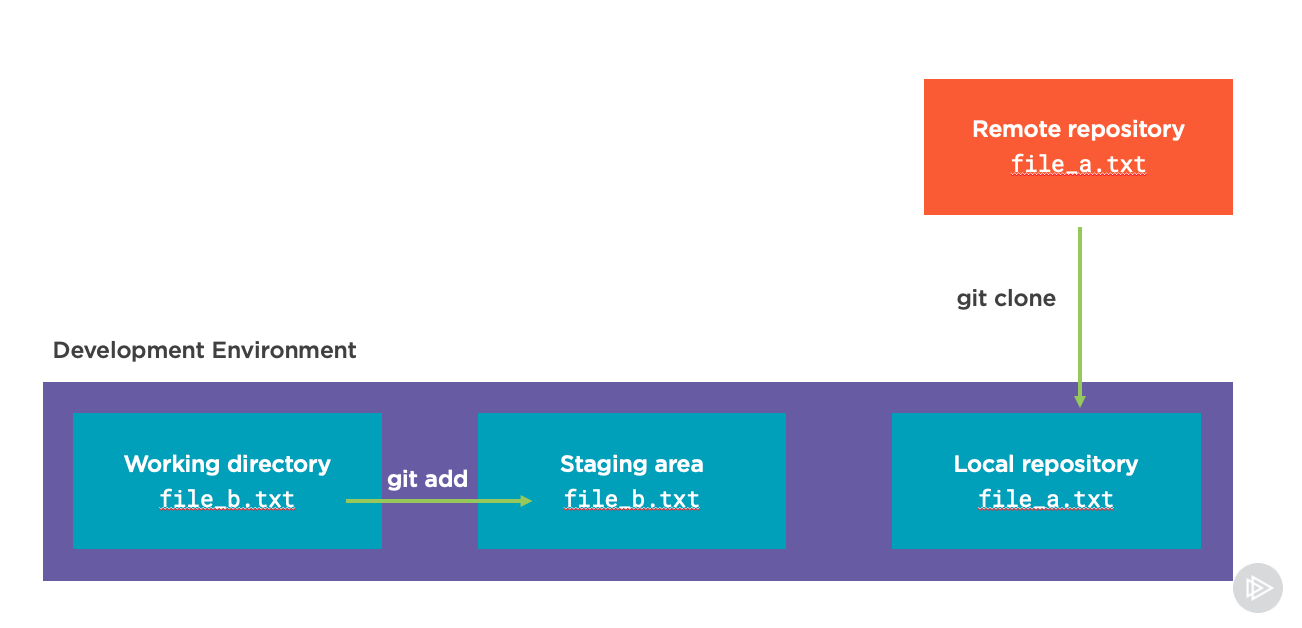
For example, to add file_b.txt to staging we would run:
git add file_b.txt
We can add files to staging (or remove them with another command) as much as we want. But when we’re ready to make these changes official we need to “commit” them. Think of this as us recording the changes locally in our repository, usually with a description of what we changed. We do this with the git commit command:
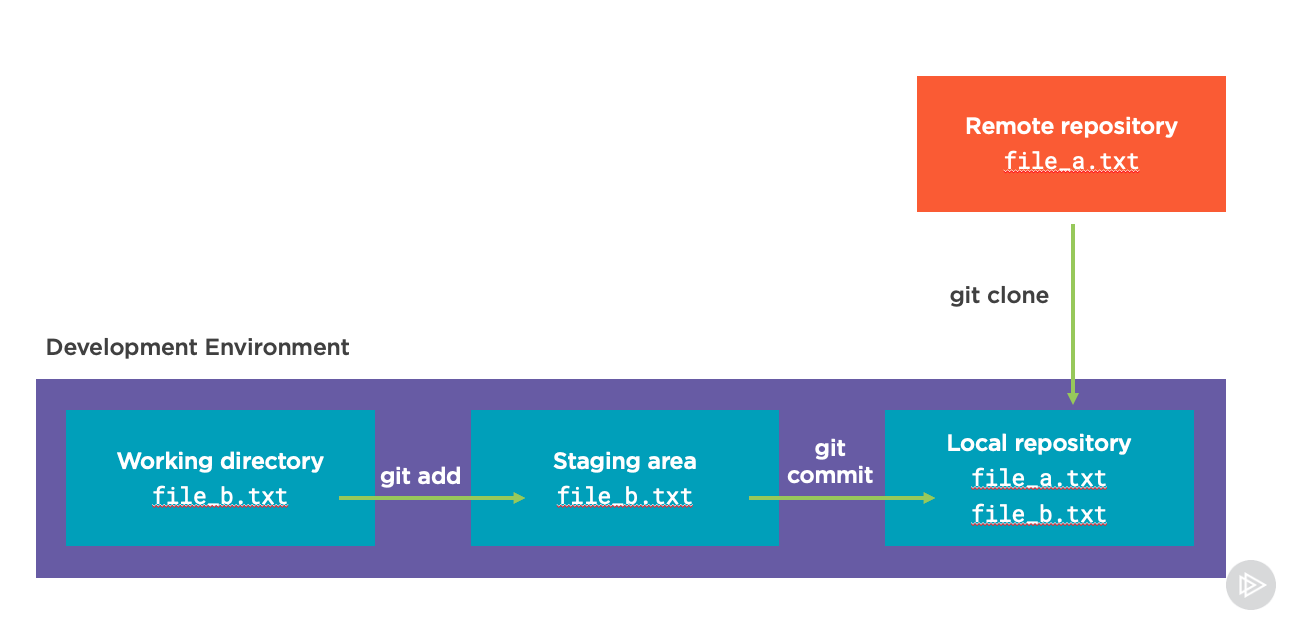
The command we actually run will usually use the -m flag to contain a message related to the code we changed. For example:
git commit -m "added file_b to our code"
With this change, we have finished creating a “commit” locally which records our code changes. But if we want to share those with other developers we will have to “push” these changes to the remote repository. We do this with the git push command:
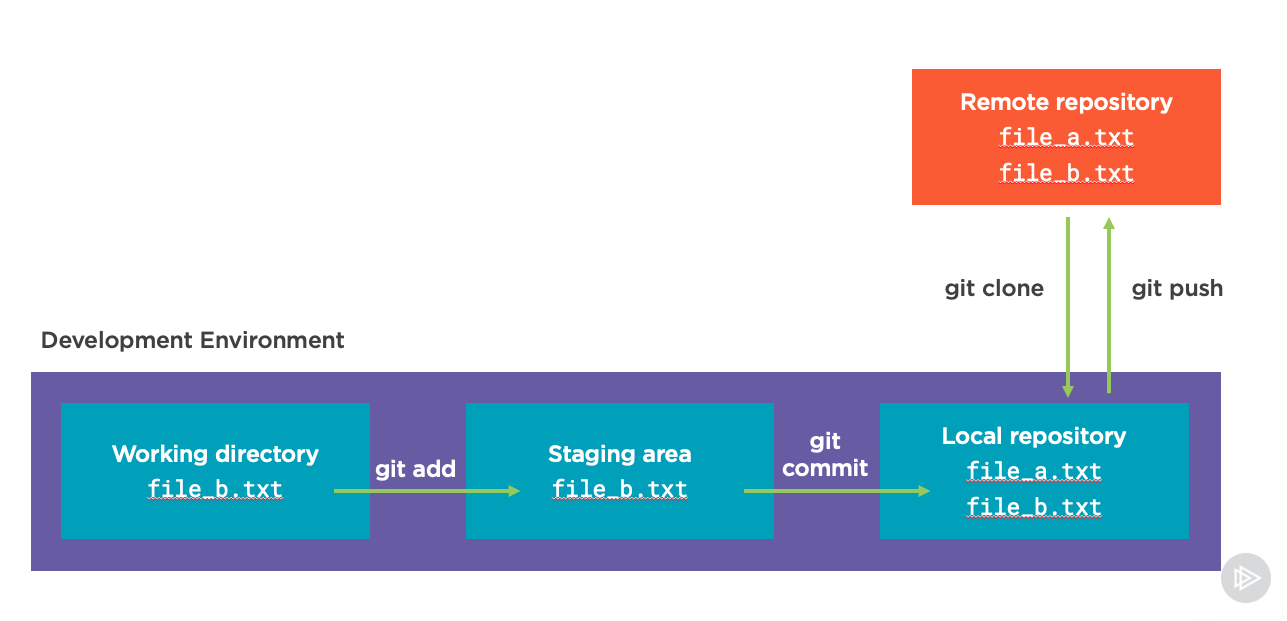
If it was just us interacting with the codebase, this might be all we needed for a while to add files and make changes. We’d basically use these commands over and over as we made changes to the codebase to record everything we’ve done. But, if we want to start working with more people, or on open source projects we probably need to understand a few more concepts.
Forks
While in many situations just git push will work, you may need to specify the remote name. By default, the remote is usually called origin. However, in some cases, such as when you are contributing to open source projects, you might have more than one remote. This is usually due to something called Forking.
Forking, is when you take one version of a remote repository, and create another remote repository that copies that one at that point in time (the fork). You then typically clone and push commits to the fork repository until you’re ready to request changes be made to the original.
So first we would create the forked remote repository from the first remote repository:
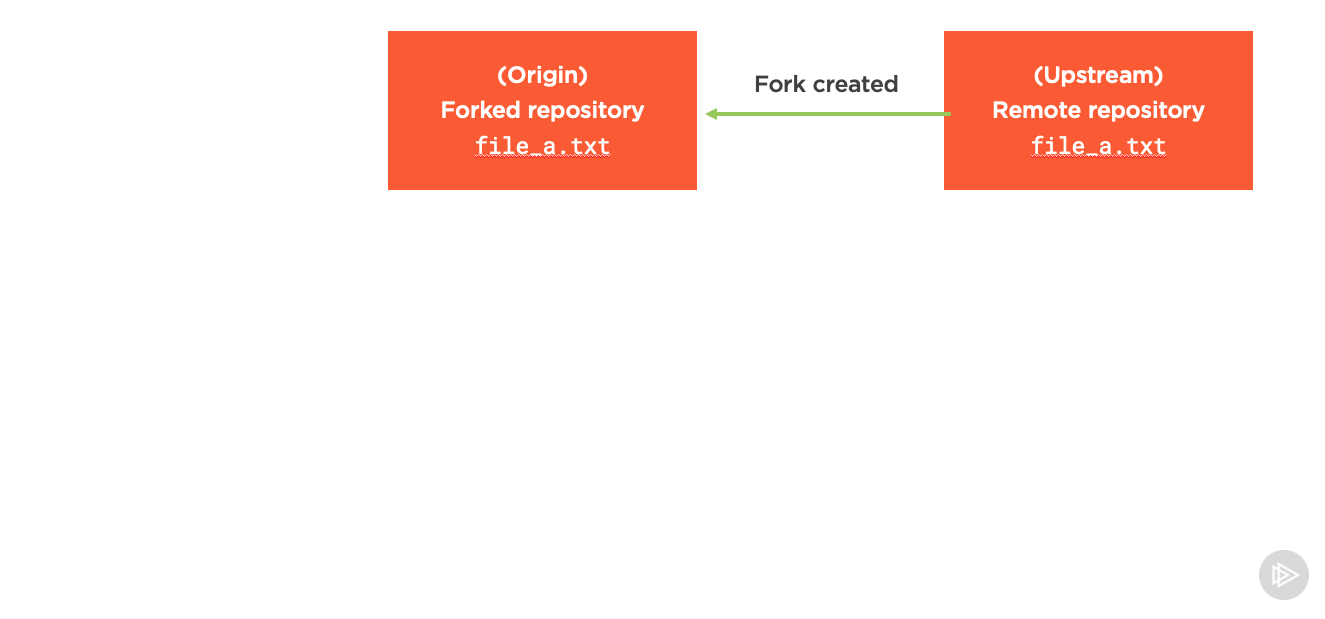
When we do this, we have to give each of the remotes names to differentiate them from one another. The first remote repository is usually called upstream, the fork is usually called origin. As a quick note - when we’re not forking repositories, the name of your remote repository usually defaults to origin too, but we didn’t really pay attention to that before because we only had one to work with!
After forking the repository, the same workflow happens locally, where we create new files (or modify old ones) in the working directory. Then we add them to the staging area with git add and commit them locally to history with git commit.
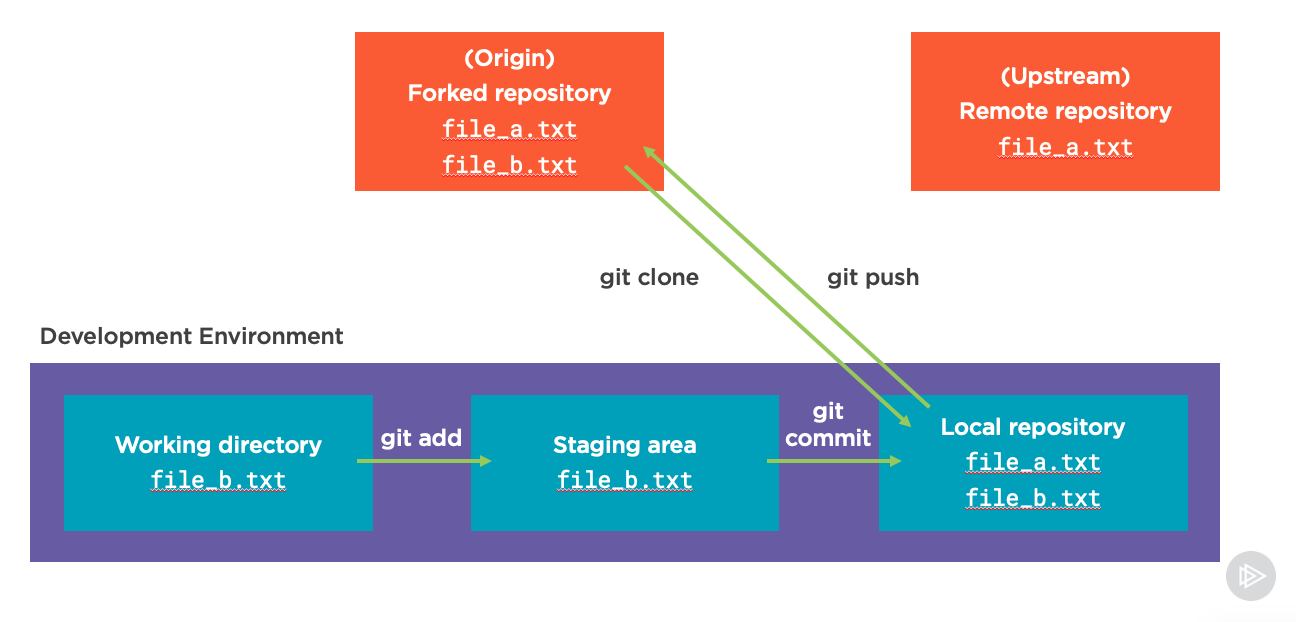
Importantly though, one thing the screenshot above leaves out is that we may want to specify which remote we’re pushing changes to. We can specify the remote inside of the git push command by adding the name of that remote right after git push. For example, if we want to push to the origin remote we can run:
git push origin
If we wanted to push directly to the upstream remote (assuming we had permissions to do that) we could run:
git push upstream
Note that the names upstream and origin are purely by convention. If you wanted to have fun, you could just as easily call the upstream repository mountaintop and the fork downriver or something else fun.
In a typical workflow, we would push our changes to the origin with git push origin and then open a pull request against the upstream repository:
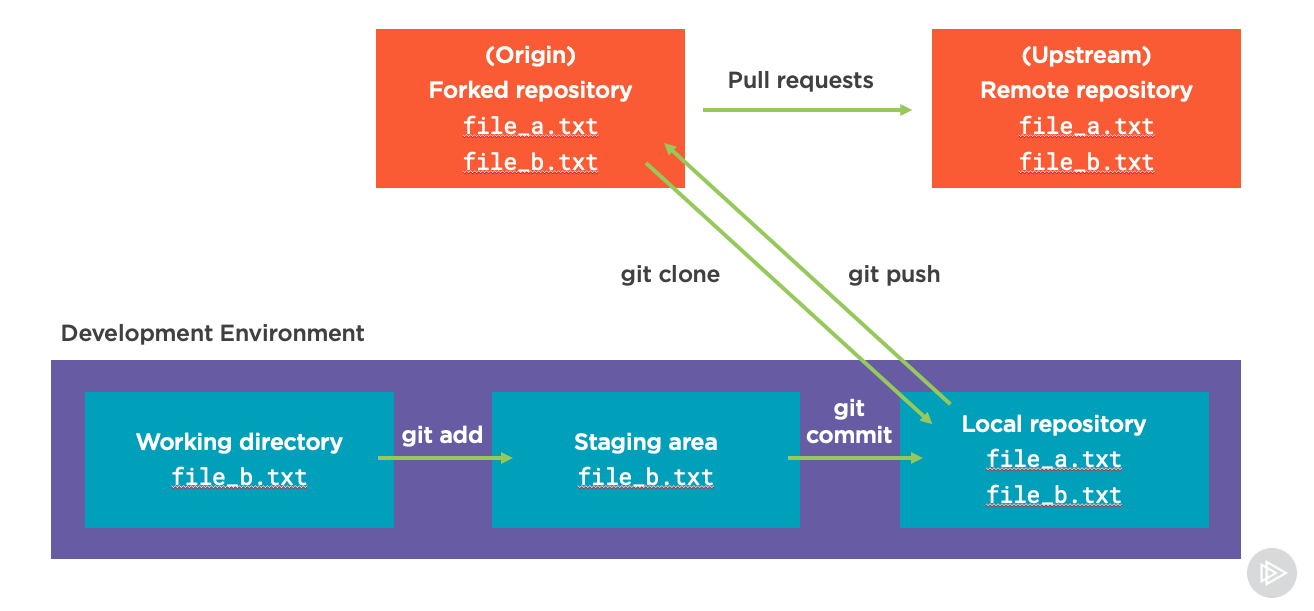
This pull request gives other developers an opportunity to use a tool like GitHub or BitBucket to review our code and approve the changes we want to make. It also allows us do things like run automatic integration tests and other code scanning to check for possible improvements or errors.
Branches
There is one more important Git concept that I’ve neglected to mention called branches. Each time we push changes in Git we’ve been doing so while working on a branch. You can think of branches as ways that we can help compartmentalize all the changes we’re making to the code. Eventually, if we’re working on two new features simultaneously we might want to keep those changes separated in two different branches.
Additionally, because we have a default branch that stores the most recent changes we want to work from, when we have features we’re adding we typically create a new feature branch and merge those changes into that default branch.
Let’s see how this works! Below, we have a main branch from an origin remote repository that we clone locally. But instead of working with the main branch (which is also commonly called master), we make changes on a new feature branch called my-feature:
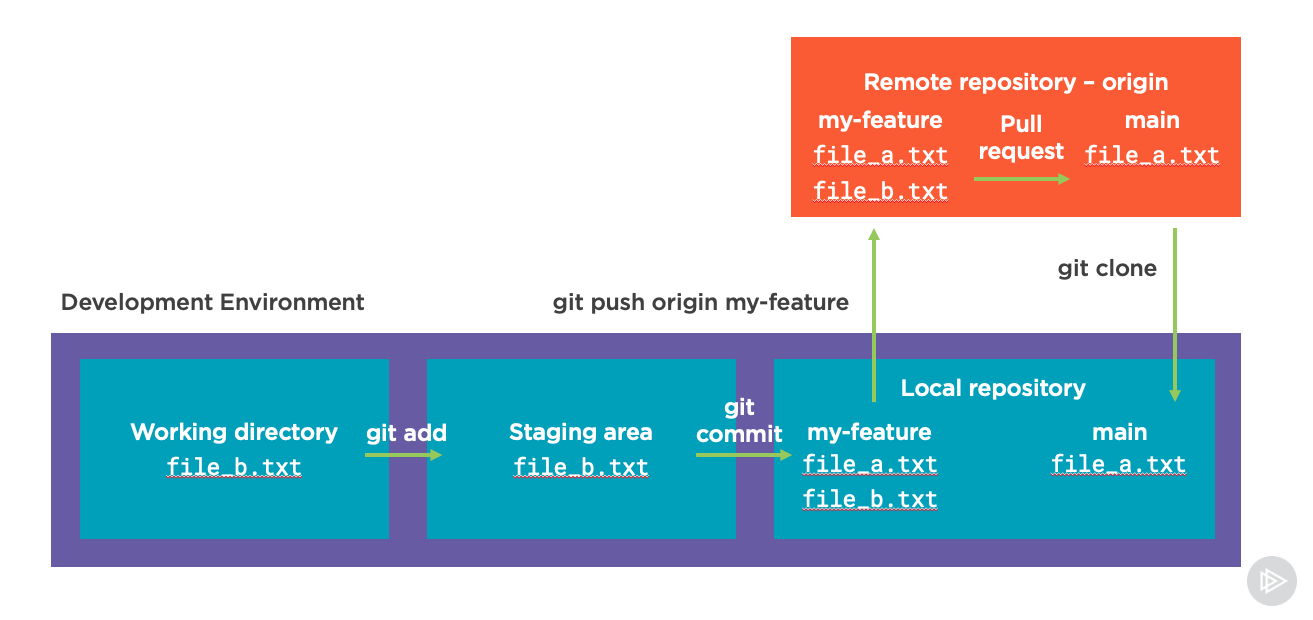
One thing that is not shown in the image above is that to create and switch to a new branch like my-feature we could run a few different commands.
We could switch to the new branch (called checking it out) and create it in just one command:
git checkout -b my-feature
We could also do this in two commands:
git branch my-feature
git checkout my-feature
When we create and switch to this new branch it will have all the files from the main branch we were just on. But for all changes we make to the my-feature branch they wont be reflected in the main branch until later.
So we can still do all the same steps to git add and git commit our changes until we’re ready to push them to the origin remote. In this case however we specify the branch name that we’re pushing to in the remote repository because we’re creating a new one there with:
git push origin my-feature
After we do this, even with a just a single remote we can typically use our GitHub or BitBucket repository system to open up a pull request from our my-feature branch to merge changes into the main branch:
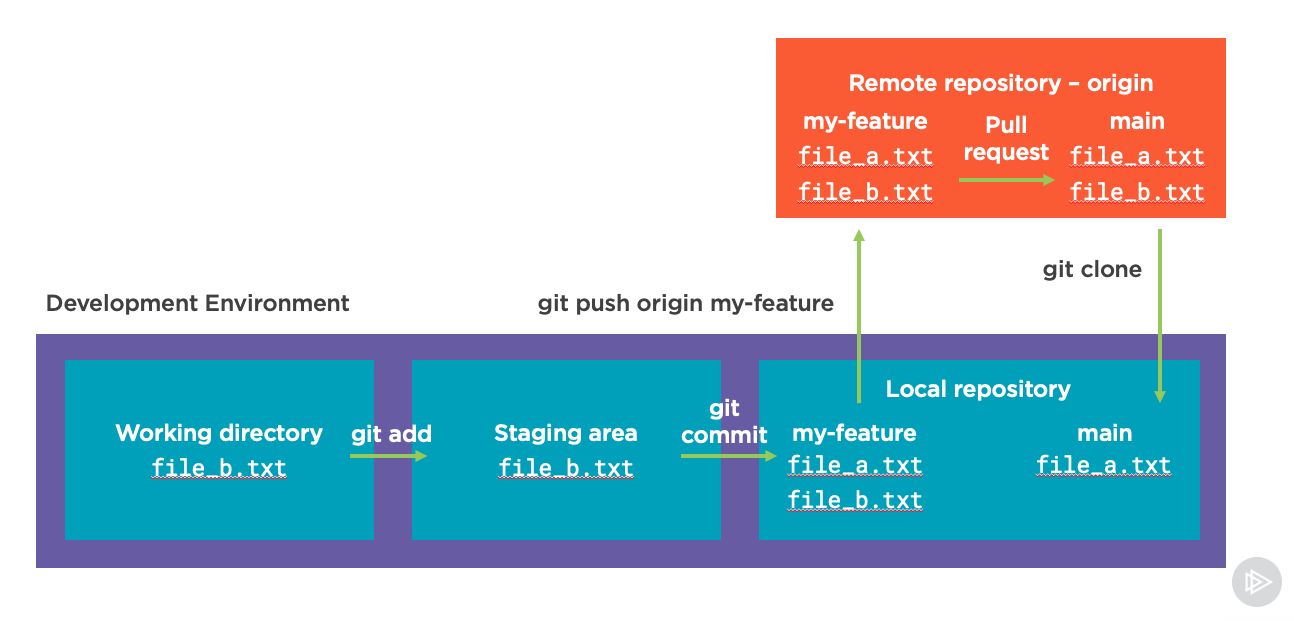
And when we’re ready to get things back in sync with our main branch locally, we can check that out with:
git checkout main
When it’s checked out, and after the pull request is merged, we can bring the changes back down from the remote repository with git pull as shown here:
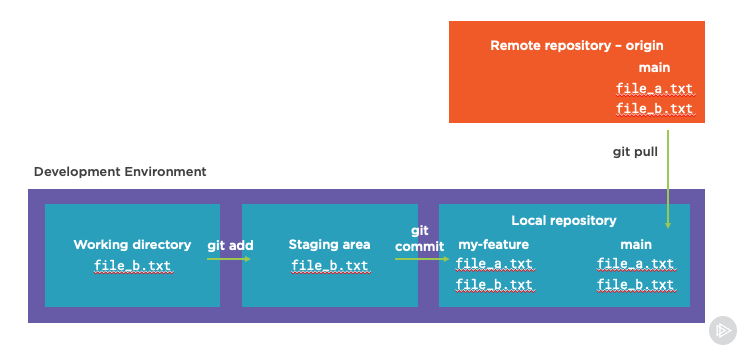
Whenever we’re done, we could delete the local feature branch because all it’s changes are merged into main using:
git branch -d my-feature
From here we just start the process again and again as we add more changes and improvements!
Summing Things Up
So we covered a lot of different concepts here including:
- Repositories - Where our code is tracked by Git
- Remotes - Where we store our code remotely, including both upstream and origin which are two different possible remote repositories
- Branches - which we use to help keep different code changes separated into features or more discrete units.
- Commiting code changes and new files
As well as a few other concepts and commands to put it all together!
If you have any questions don’t hesitate to leave a comment below or reach out to me on Twitter!
