
Have you ever tried to do something with CloudFormation but just needed a little something more to get the job done? In those cases I’ve started using CloudFormation custom resources. These resources essentially allow you to extend the use of CloudFormation templates whenever you create, update or delete a stack.
In this tutorial, I’ll show you how you could use these custom resources to provision your DynamoDB tables with some data. This can be useful if you’d like to run additional testing on your AWS environment that requires actual data inside of the environment.
Writing Your CloudFormation Template
The first step in this process is to add several resources to an existing CloudFormation stack. I’ve included a full example below that also includes a DynamoDB table resource that will be acted upon by our custom resource.
Apart from that DynamoDB resource, you will need to add:
- A Lambda function resource (in this case called
DDBLambdaLoader). - An IAM role for the Lambda function (in this case called
DDBLambdaLoaderRole). - A custom resource that references the Lambda Function (in this case called
CRDataLoader).
Here’s the full template:
{
  "AWSTemplateFormatVersion" : "2010-09-09",

  "Resources" : {
    "DDBTestTable" : {
      "Type" : "AWS::DynamoDB::Table",
      "Properties" : {
        "AttributeDefinitions" : [
          {
            "AttributeName" : "ClientId",
            "AttributeType" : "S"
          }
        ],
        "KeySchema" : [
          {
            "AttributeName" : "ClientId",
            "KeyType" : "HASH"
          }
        ],
        "ProvisionedThroughput" : {
          "ReadCapacityUnits" : "5",
          "WriteCapacityUnits" : "5"
        },
        "TableName" : "Clients"
        }
    },
    "DDBLambdaLoader": {
      "Type": "AWS::Lambda::Function",
      "Properties": {
        "Code": {
            "S3Bucket": "your-bucket-with-function-code",
            "S3Key": "package.zip"
        },
        "Handler": "loader.handler",
        "Role": { "Fn::GetAtt" : ["DDBLambdaLoaderRole", "Arn"] },
        "Runtime": "python3.6",
        "Timeout": "60"
      },
      "DependsOn" : "DDBLambdaLoaderRole"
    },
    "DDBLambdaLoaderRole": {
      "Type": "AWS::IAM::Role",
      "Properties": {
        "AssumeRolePolicyDocument": {
          "Version": "2012-10-17",
          "Statement": [{
              "Effect": "Allow",
              "Principal": {"Service": ["lambda.amazonaws.com"]},
              "Action": ["sts:AssumeRole"]
          }]
        },
        "Path": "/",
        "Policies": [{
          "PolicyName": "root",
          "PolicyDocument": {
            "Version": "2012-10-17",
            "Statement": [{
                "Effect": "Allow",
                "Action": ["logs:CreateLogGroup","logs:CreateLogStream","logs:PutLogEvents"],
                "Resource": "arn:aws:logs:*:*:*"
            },
            {
                "Effect": "Allow",
                "Action": ["dynamodb:PutItem","dynamodb:UpdateItem","dynamodb:DeleteItem"],
                "Resource": "arn:aws:dynamodb:*:*:*"
            }]
          }
        }]
      }
    },
    "CRDataLoader": {
      "Type": "Custom::DDBLambdaLoader",
      "Properties": {
        "ServiceToken": {
          "Fn::GetAtt": [
            "DDBLambdaLoader",
            "Arn"
          ]
        }
      },
      "DependsOn" : ["DDBLambdaLoaderRole", "DDBLambdaLoader", "DDBTestTable"]
    }
  }
}
Like we mentioned earlier, this template does a few things for us:
- It creates a DynamoDB table. You could also include all other resources you require in your environment.
- It creates a Lambda Function, and a role for that function. This function is used to do all the custom work in the AWS environment and as such the role will need to have all the permissions required to take whatever actions you’d like. In this case, we make sure it has permissions to work with DynamoDB tables (you may want to restrict the role permissions to only the test DynamoDB table when using it in production).
- We also create a Custom Resource Data Loader
CRDataLoader. This resource is what kicks off the process of using the Lambda function we created to continuing with the custom provisioning of the account. As such it needs to make sure to be created after the rest of the resources so it can use them. We do this by including the “DependsOn” section in theCRDataLoaderresource and make it depend on the Lambda function, the role and the DynamoDB table. That will make sure the resources we want to use or act on will be ready when theCRDataLoaderstarts creating.
Preparing Your Lambda Function
So now that we have our template taken care of, let’s take a look at our Lambda Function code. First up, let’s look at our loader.py file:
import boto3
import cf_response
import random
import time
import uuid

def handler(event, context):
    try:
        # This automatically succeeds when the custom resource is called during deletion
        # It uses the cf_response file which
        if event['RequestType'] == 'Delete':
            cf_response.send(event, context, 'SUCCESS', {'Status': 'SUCCESS'})
            return 'SUCCESS'
        # This is the real core 'custom' part of this custom resource
        # All it does it write 10 test items to a DynamoDB table
        # But you can really do anything supported by the AWS SDKs
        i = 0
        while i < 10:
            i = i + 1
            clients_table = boto3.resource('dynamodb').Table('Clients')
            clients_table.put_item(
                Item={
                    'ClientId': str(uuid.uuid4()),
                    'paymentStatus': random.choice(['paid', 'overdue', 'canceled'])
                }
            )
            # Wait a little because the table only has 5 write capacity units
            time.sleep(0.25)
        # If all this works...
        # Then return response to CloudFormation saying this was successful
        cf_response.send(event, context, 'SUCCESS', {'Status': 'SUCCESS'})
    except Exception as e:
        # Return a failure to CloudFormation if there's an error in the process above
        print(str(e))
        cf_response.send(event, context, 'FAILED', {'Status': 'FAILED'})
So the function above essentially just writes a few rows to our DynamoDB table. It’s that simple. Fortunately for us we could have this function do almost anything. We’re basically only limited by the AWS SDK, in this case boto3 (for Python).
Understanding the cf_response File
But, as you might have noticed, we’re using a cf_response in the code above. What’s going on there? Well, that’s basically just a handy file for dealing with sending the required information to CloudFormation whenever we succeed or fail. Here it is:
from botocore.vendored import requests
import json

def send(event, context, responseStatus, responseData, physicalResourceId=None):
    responseBody = {
        'Status': responseStatus,
        'Reason': 'See the details in CloudWatch Log Stream: ' + context.log_stream_name,
        'PhysicalResourceId': physicalResourceId or context.log_stream_name,
        'StackId': event['StackId'],
        'RequestId': event['RequestId'],
        'LogicalResourceId': event['LogicalResourceId'],
        'Data': responseData
    }
    json_responseBody = json.dumps(responseBody)
    headers = {
        'content-type' : '',
        'content-length' : str(len(json_responseBody))
    }
    try:
        response = requests.put(
            event['ResponseURL'],
            data=json_responseBody,
            headers=headers
        )
        print("Status code: " + response.reason)
    except Exception as e:
        print("send(..) failed executing requests.put(..): " + str(e))
All this really does, is process the data from the event and then take the response (success or failure) and form the request to pass along to CloudFormation at the ResponseURL. This particular file is adapted from this AWS example.
Putting Everything Together
So let’s actually test out this demo now that we understand how everything works. I’ll assume you have the AWS CLI installed and are on a Linux or Mac system (sorry Windows folks!).
- Clone the code with
git clone https://github.com/fernando-mc/cloudformation-custom-resource-lambda - Build the Lambda Function package:
mkdir setup
cp cf_response.py setup/
cp loader.py setup/
cd setup
zip -r ../package.zip ./*
cd ..
rm -r ./setup
- Pick an existing S3 bucket you own or create one with
aws s3api create-bucket --bucket your-completely-unique-bucketname - Update the Lambda Function resource in your CloudFormation template:
Specifically, you need to change the your-bucket-with-function-code value to a real bucket you own.
"Properties": {
        "Code": {
            "S3Bucket": "your-completely-unique-bucketname",
            "S3Key": "package.zip"
        },
- Move the function package to the S3 bucket with
aws s3 cp ./package.zip s3://your-completely-unique-bucketname/package.zip - Create your CloudFormation Stack and watch the custom resource work it’s magic with
aws cloudformation create-stack --stack-name cr-ddb-example --template-body file://template.json --capabilities CAPABILITY_IAM
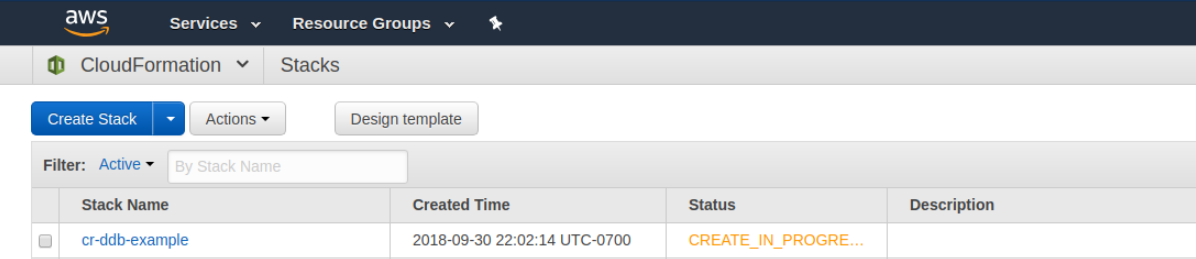
After this command executes you can login to the CloudFormation section of the AWS Console and watch the magic happen.
First, you’ll notice that the Stack has started creating.
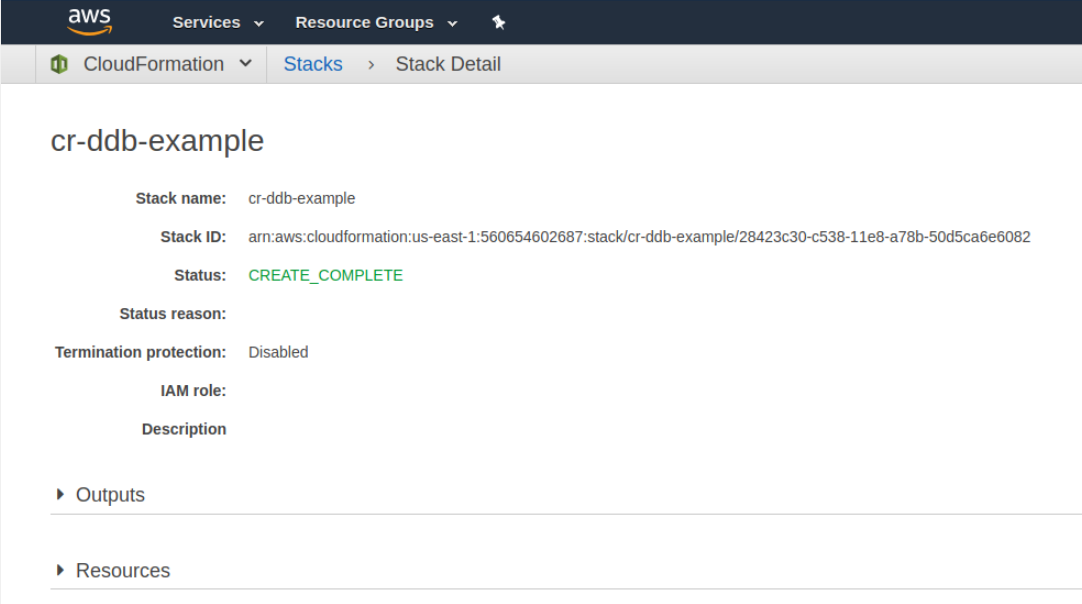
If you click on the name of the Stack then you can start to review the details of the creation progress. You should notice that the stack finishes creating pretty quickly.
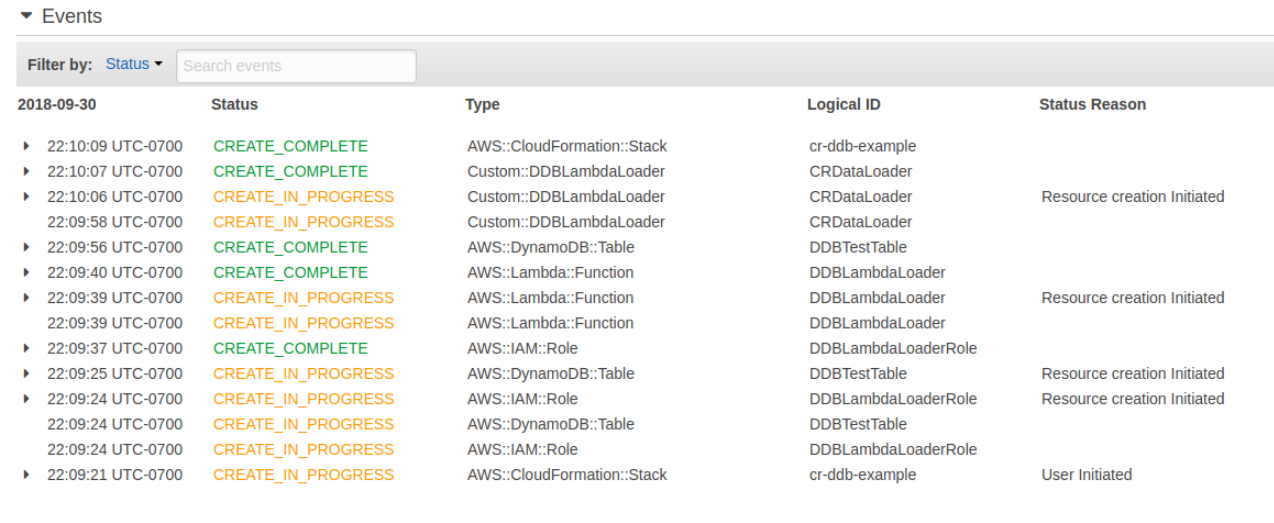
After the stack finishes creating you should also be able to review the order of the resources created. You’ll notice that the IAM role and the DynamoDB table started first (reading up from the bottom). After the IAM Role finished creating the Lambda function then started creating. After the Lambda function and the DynamoDB table then finished creating the custom resource then kicked off and finished too. The custom resource took about nine seconds from start to finish and the entire process took around 48 seconds.
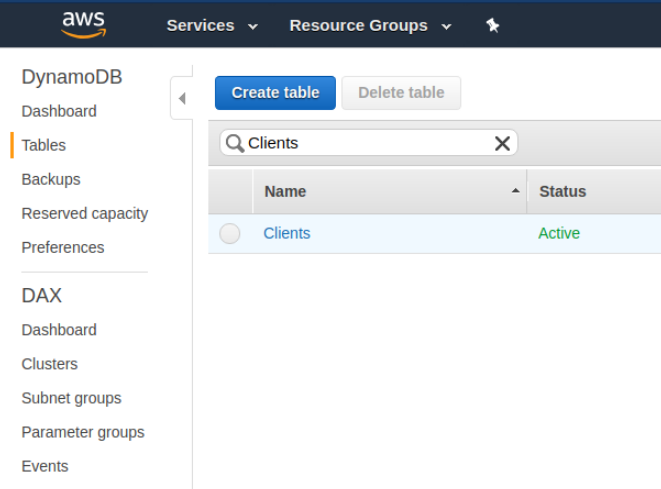
Now, if you visit the DynamoDB section of the AWS console you can actually check the results of your custom resource. You’ll see the clients table underneath the tables section.
And, within the items of the clients table, you’ll see the data we had our custom resource add in.

Now this particular scenario is somewhat of a contrived example. However, remember that you can extend the code within the Lambda function to do basically anything. Here are just a few ideas for what you can do with CloudFormation custom resources:
- Provision additional resources that are supported by the SDKs but not CloudFormation
- Send messages to an SQS queue
- Send a success email via SES at the end of a successful deployment
- Load up data from S3 into a database
- Prewarm Lambda Functions that makeup a public-facing API
Hopefully this helps you in your CloudFormation journeys! If you end up using it all the code I’ve included is MIT licensed - just do me a favor and let me know what you build with it in the comments below!