
Today is the third installment of my Twenty Projects in Twenty Days series! We’ll be following up from yesterday’s post on creating a serverless Flask API on AWS by doing the same thing with Node.js and Express.js!
We’ll be using Express.js, Amazon Web Services, and the Serverless Framework to create a survey API to manage the same three entities as yesterday:
- Customers
- Surveys
- Survey Responses
We’ll also be using the same data storage architecture as last time by using an Amazon DynamoDB table. Similarly, we’re keeping around the same Amazon API Gateway and AWS Lambda architecture. So let’s get to it!
Prerequisites
First, we’ll need to make sure we’ve got the dependencies we need! Make sure you’ve already got these things installed on your machine:
- An AWS Account and the AWS CLI setup with your AWS Account credentials.
- The Serverless Framework
- Node.js
When you have all of these installed, just grab the code from the GitHub repo.
- Run
git clone https://github.com/fernando-mc/express-based-api.gitto clone the repo.
In the repo, you’ll see a folder structure like this:
.
├── entities
│   ├── customers.js
│   ├── responses.js
│   └── surveys.js
├── index.js
├── package.json
└── serverless.yml
It should look pretty similar to yesterday’s project. But let’s review all the parts of this app so we know what’s happening in here!
Reviewing the Code
index.js
The main file that ties the API together is the index.js file. Inside of this file, we start by brining in our dependencies:
const serverless = require('serverless-http')
const express = require('express')
const app = express()
The serverless-http requirement will allow us to work with Express.js in AWS Lambda. We also bring in Express.js and then create the express app.
After this, we bring in our entities from the entities folder:
var customers = require('./entities/customers');
var surveys = require('./entities/surveys');
var responses = require('./entities/responses');
The remainder of index.js is used to create different endpoints that help us interact with our entities using HTTP requests. The first two allow us to create and get a customer:
app.post('/customer', async function (req, res) {
  const body = JSON.parse(req.body)
  const response = await customers.create(body)
  res.send(response)
})

app.get('/customer/:customer_id', async function (req, res) {
  const customer_id = req.params.customer_id
  const response = await customers.get(customer_id)
  res.send(response)
})
In order, they create a HTTP POST and GET endpoint. The POST endpoint parses an incoming JSON body request and sends it along to the customers.create() method to create a customer in the database. Whereas the GET endpoint takes the incoming value in the URL after /customer/ and looks for a customer with that customer_id. We’ll see these in action in just a moment.
Our Entities
Next up, we’ll take a look at the entities folder.
├── entities
│   ├── customers.js
│   ├── responses.js
│   └── surveys.js
Inside the entities folder we have all the different files with methods for creating, and getting data on our customers, surveys and responses. Let’s focus on the customers.js file for now. Inside there we load up some dependencies and configuration:
// Load the AWS SDK for JS
var AWS = require("aws-sdk");
AWS.config.update({region: 'us-east-1'});

// Create the DynamoDB Document Client
var dynamodb = new AWS.DynamoDB.DocumentClient();
var tableName = process.env.DYNAMODB_TABLE
Specifically, we use the aws-sdk to interact with AWS services like Amazon DynamoDB. We also load in an environment variable called DYNAMODB_TABLE - we’ll set this up in the serverless.yml file.
Afterwards, we have a two functions - one to create customers and another get a customer’s data. The create function looks like this:
module.exports.create = async function(body) {
    const customer_id = body['customer_id']
    const profile_data = body['profile_data']
    const putParams = {
        TableName: tableName,
        Item: {
            'pk': 'CUSTOMER#' + customer_id,
            'sk': 'PROFILE#' + customer_id,
            'profile_data': profile_data
        }
    }
    try {
        await dynamodb.put(putParams).promise()
        return putParams.Item
    } catch (error) {
        console.log(error)
        throw new Error(error)
    }
}
It lets us process incoming data and then put a new item in DynamoDB. If we want to get data back out, we can use the get function, which takes a customer_id and looks up the item using that id:
module.exports.get = async function(customer_id) {
    const getParams = {
        TableName: tableName,
        Key: {
            'pk': 'CUSTOMER#' + customer_id,
            'sk': 'PROFILE#' + customer_id,
        }
    }
    let getResult
    try {
        getResult = await dynamodb.get(getParams).promise()
        return getResult
    } catch (error) {
        console.log(error)
        throw new Error(error)
    }
}
In the other entities files we have very similar operations to allow us to create and get the entities we’re working with as well as allowing for more complex queries like returning all the responses for a particular survey or all the surveys for a particular customer. To learn more of the complex details around using DynamoDB you can take my Pluralsight course on Connect DynamoDB to Your Application where I cover a lot of the details. Just sign up for my mailing list and reply to the welcome email and I’ll give you a 30-day free trial!
So now that we know how the Express.js application is creating and interacting with our DynamoDB table using the files in the entities folder and how it sets up Express.js routes in index.js, let’s look at how the infrastructure for this all gets deployed!
The serverless.yml file
In order to create the Lambda Function that will run our code, the API Gateway endpoints that will make the API endpoints public, and the DynamoDB table resource, we’ll be using the Serverless Framework. The Serverless Framework configuration is all stored in the serverless.yml file. Let’s take a look!
The first line just gives our service a name:
service: express-api
The next top-level section is the provider section and configures some details about our service:
provider:
  name: aws
  runtime: nodejs12.x
  environment:
    DYNAMODB_TABLE: ${self:service}-${opt:stage, self:provider.stage}
  iamRoleStatements:
    - Effect: Allow
      Action:
        - dynamodb:Scan
        - dynamodb:Query
        - dynamodb:PutItem
        - dynamodb:UpdateItem
        - dynamodb:GetItem
      Resource:
        - "arn:aws:dynamodb:${opt:region, self:provider.region}:*:table/${self:provider.environment.DYNAMODB_TABLE}"
        - "arn:aws:dynamodb:${opt:region, self:provider.region}:*:table/${self:provider.environment.DYNAMODB_TABLE}/index/sk-pk-index"
The provider section specifies that we’re using Amazon Web Services, that we’ll be using nodejs12.x as the runtime in AWS Lambda and that we’ll have an environment variable we want make available to our application when it runs - specifically this will be the DYNAMODB_TABLE variable. It will be a stage-specific variable that changes depending on the stage it’s deployed to. In this case, when we deploy initially it would evaluate to express-api-dev for the dev stage of the application.
We also have the iamRoleStatements section which allocates AWS Identity and Access Management permissions for our service so it can take actions on AWS Service. In this case, it gives permissions to the service to add data to DynamoDB and get it back out. It also gives these permissions both for the main table and an index on the table called sk-pk-index that we create to provide more query patterns.
Next, there is the functions section:
functions:
  app:
    handler: index.handler
    events:
      - http: ANY /
      - http: 'ANY {proxy+}'
This specifies the index.js file and the handler inside of it (which you can see if you scroll to the bottom of the file) as the thing that will handle incoming request data. This basically just configured the Express.js app to be the thing that processes data. It also creates an AWS API Gateway API using the http events that will pass all requests along to the Express.js app.
Next, there is the resources section:
resources:
  Resources:
    surveysTable:
      Type: AWS::DynamoDB::Table
      Properties:
        TableName: ${self:provider.environment.DYNAMODB_TABLE}
        AttributeDefinitions:
          - AttributeName: pk
            AttributeType: S
          - AttributeName: sk
            AttributeType: S
        KeySchema:
          - AttributeName: pk
            KeyType: HASH
          - AttributeName: sk
            KeyType: RANGE
        ProvisionedThroughput:
          ReadCapacityUnits: 1
          WriteCapacityUnits: 1
        GlobalSecondaryIndexes:
        - IndexName: sk-pk-index
          KeySchema:
          - AttributeName: sk
            KeyType: HASH
          - AttributeName: pk
            KeyType: RANGE
          Projection:
            ProjectionType: ALL
          ProvisionedThroughput:
            ReadCapacityUnits: 1
            WriteCapacityUnits: 1
In here, we describe the details of the Amazon DynamoDB table that we want to use with our application. We also describe the fact we want an index on the table in order to enable more query patterns. In this configuration we use the environment DYNAMODB_TABLE variable we setup in the earlier section when we use this syntax here: ${self:provider.environment.DYNAMODB_TABLE}.
And that’s it! We’re almost ready to deploy!
package.json
The last file to look at is the package.json file. This is pretty basic:
{
  "name": "express-api",
  "version": "1.0.0",
  "description": "",
  "main": "index.js",
  "scripts": {
    "test": "echo \"Error: no test specified\" && exit 1"
  },
  "keywords": [],
  "author": "",
  "license": "ISC",
  "dependencies": {
    "express": "^4.17.1",
    "serverless-http": "^2.3.2",
    "uuid": "^7.0.2"
  }
}
Really, the only interesting part is that it contains the dependencies we need in this app like Express.js itself, the serverless-http dependency to allow it to work in AWS Lambda, and the uuid dependency to help create unique IDs for some of the entities in our application. So now that we know about everything that’s in here let’s deploy!
Deploying Our Application
If you’ve already installed the prerequiesites I mentioned above like the AWS CLI, Node.js and the Serverless Framework you should be able to get started pretty fast.
First, run npm install to get the dependencies you need installed. Then run serverless deploy!
When the deployment finishes you should see something like this:
Service Information
service: express-api
stage: dev
region: us-east-1
stack: express-api-dev
resources: 13
api keys:
  None
endpoints:
  ANY - https://75ciqcblhj.execute-api.us-east-1.amazonaws.com/dev
  ANY - https://75ciqcblhj.execute-api.us-east-1.amazonaws.com/dev/{proxy+}
functions:
  app: express-api-dev-app
layers:
  None
Serverless: Run the "serverless" command to setup monitoring, troubleshooting and testing.
The API Endpoints you get will have a different random alphanumeric id than the one I show here. This endpoint is the essentially the root of your Express.js application. Everything after /dev/ will then return whatever is configured by Express.js - so let’s test it!
Testing Our Application
With the application deployed you can test the API using a tool like Postman.
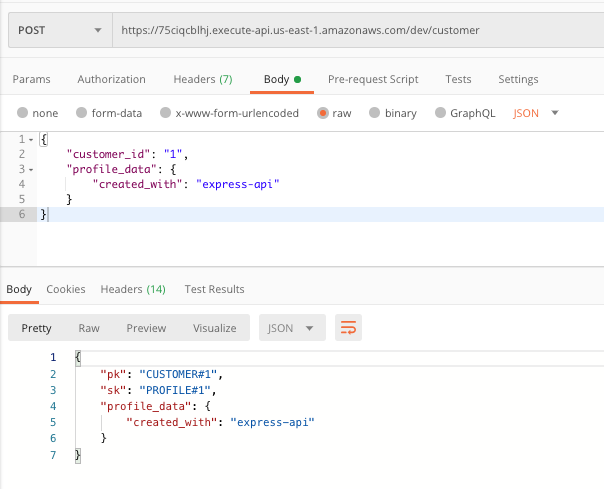
You can copy the endpoint that was output after serverless deploy and then create a POST request in Postman with this JSON to create a new customer:
{
	"customer_id": "1",
	"profile_data": {
		"created_with": "express-api"
	}
}
Here is how I did this in Postman:
From there, you can get the data back our with a GET request for the specific customer you created (make sure you use the same customer_id as the one you put in previously). Here’s the URL I would use: https://75ciqcblhj.execute-api.us-east-1.amazonaws.com/dev/customer/1
In Postman it looks like this:
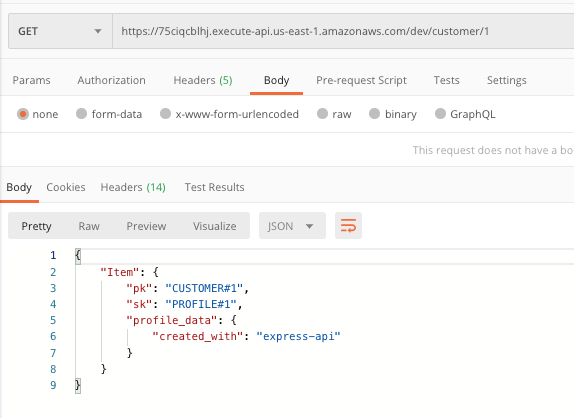
But you can also open the URL up in your browser to test it out.
And that’s it! You can test all the other endpoints out and play around with the application!
If you’d like to learn more about Serverless development, just sign up for my mailing list and reply to the first email to ask for access to all my Pluralsight courses on AWS Lambda, DynamoDB, and the Serverless Framework for free for 30 days!